Practicing correct running form can be quite a challenge. That’s especially true when switching from flat surfaces to running on hills, wet surfaces, or even on a trail.
In this article, that’s what we’re going to explore. We’ll discuss proper running form on flats, hills, snow, rain, sand, and similar surfaces in the following sections.
How To Run On Flat Surfaces
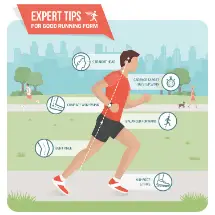
Let’s start with the basics of how to run on flat surfaces. Here, we’re going to discover proper running form on such surfaces by considering what you should do with your eyes, neck, head, shoulders, spine, hips, and of course, your feet and toes.
Eyes
Ideally, you should focus your eyes on the ground 10-20 feet in front of you. That will allow you to see where you’re going while also preventing yourself from tripping over anything small on the ground.
Neck
Keep your neck perfectly aligned with your spine. If your neck feels relaxed, then you’re doing it right!
Head
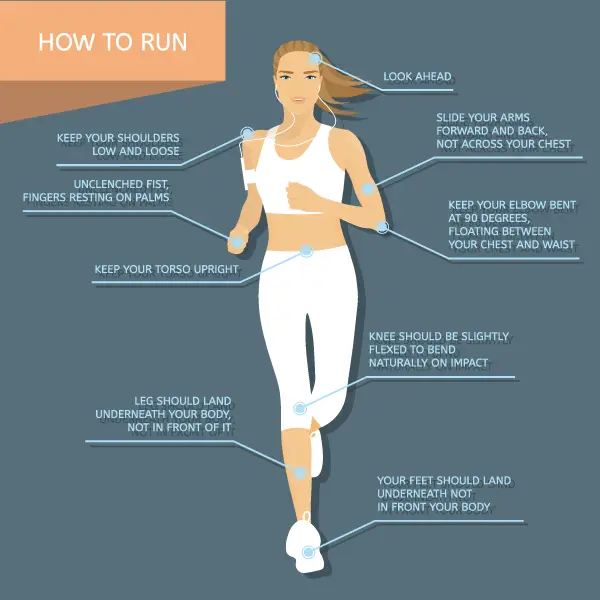
How do you prevent your head from leaning forward or backward too much? That’s easy! Just make sure that your ears are directly above your shoulders. By using your shoulders as a reference point, you’ll keep your head in a position of maximum comfort as you run.
Shoulders
If your shoulders guide the placement of your head, where should your shoulders be? Well, your shoulders should be straight and relaxed but not stiff. Remember: if any part of your body is stiff while you run on flats, you’re doing something wrong!
When you feel tension building while running remember to focus on breathing and relax your shoulders.
Spine
Your spine is the backbone (literally) of proper running form. When running on flat surfaces, your spine should be in what’s known as a ‘neutral’ position, i.e. its most natural position.
That means:
- Tailbone and pelvis underneath your ribs.
Practice this neutral spine position in the mirror, and you’ll find that you’ll be able to run much better as you master it.
Hips
Here’s a common mistake new runners make: they twist their trunks while running. For some new runners, this gives them the feeling that they’re moving faster and harder, but what they don’t know is that they are setting themselves up for LPHC muscle imbalances and possible future hip injuries. That’s not necessary to run with more power! Instead, focus on leaning forward by about five degrees if you’re running at a regular pace.
If you’re running a race or at a more aggressive pace, then lean at a 10-degree angle instead. But remember: never twist!
Hands
Your hands should be slightly cupped. Don’t clench your fists or point your thumbs up which creates tension that slowly reduces your injury level. Remember when anything is tense while running your muscles are needing more energy to be kept in that state versus a state of relaxation.
Feet and Toes
Alright, so this is the part that most runners are already familiar with. When running on flat surfaces, you should always land on the middle of your sole and then roll forward towards the tip of your toes. As you do that, you’ll lift your heel and repeat the sequence on your next step. Make sure when you’re running most of your runs that your feet don’t extend beyond the knee upon landing unless you are sprinting or simply running for your life.
Breathing
Make sure you’re breathing in through your nose and mouth.
When you’re first starting out running, don’t focus too much on breathing form and economy. If you read the breathing patterns below and simply get it then by all means follow one of the patterns listed below. If on the other hand, you just can’t master it, then simply remember to breathe deeply from the bottom of your lungs, in and out, slow long breaths. If you’re panting or gasping for air you’re probably running beyond your means. If this happens on an easy run then you need to dial back your pace a little bit and focus on deep breaths.
2:2 Breathing Pattern
Breathe in for the duration of 2 steps. Breathe out for the duration of 2 steps.
3:2 Breathing Pattern
Breathe in for the duration of 3 steps. Breathe out for the duration of 2 steps. Focuses more time on inhaling.
2:3 Breathing Pattern
Breathe in for the duration of 2 steps. Breathe out for the duration of 3 steps. Focuses more time on exhaling.
I personally use a 2:2 breathing pattern (even breathing) on most of my runs. If I find that I’m tired or I’m running an extremely easy workout then I will naturally gravitate towards a 2:3 pattern (exhaling more).
There is no absolute right or wrong way to breathe, except short shallowing breathing, which usually occurs because you’re out of shape. On some speed workouts, you might end your last repeats in this state, but most of your runs should avoid shallow breathing. The more volume of air that your body can process the more efficient your breathing and running economy will be. That’s what aerobic exercise is all about – aerobic meaning oxygen – which creates energy in the oxidative stages of metabolism.
Breathing deep breaths while running also helps relax you and eases tension that might form in your shoulders and the rest of your body.
Related: Why Do I Feel Tired After I Run (besides exerting energy)?
Cadence
Cadence is defined as the number of steps per minute a runner takes (also known as stride rate). Ideally, you want to run with a higher cadence and a shorter stride length.
Almost all basic GPS Running watches can help track your cadence. For a list of running watches, I’ve personally reviewed check out: Best GPS Running Watches for half marathons and marathons.
180+ steps per minute claim to be the sweet spot for optimal running cadence (short stride length and increased cadence)
Stride length
Longer Stride Length (need to avoid)
Runners that tend to have a longer stride length ten to be over-striders. Prolonged running among over striders could possibly lead to running injury. Here are some of the reasons why a longer stride length might be setting you up for injury:
- The heel tends to plant first on the ground (over-striking)
- The foot tends to jam into the ground the longer your stride length is
- Your foot lands out in front beyond the hips
- Longer stride lengths tend to spend more time in the air thus less time touching the ground running (decreased cadence)
Shorter Strides (need to master)
- Feet spend less time in the air
- Less time in the air means your feet touch the ground more often (increased cadence)
- Feet spend more time on the ground trying to move you forward making you faster
- Feet tend to land right in front of the hips (ideal target landing for feet).
- With a shorter stride, your feet tend to land on the midsole of the foot instead of the heel.
Variations In Proper Running Form
Now, let’s look at the necessary adjustments in proper running form when going uphill, downhill, on a trail, on slippery surfaces, on the sand, or sprinting on a track.

When Running Uphill
For most runners, their instinct is to lean forward when running uphill. The problem with that is most people bend forward at the waist, which reduces your legs’ ability to push your body forward.
Instead, keep your back straight and tell yourself to ‘stand tall’ while leaning forward slightly. That will keep your entire form at just the right angle to run uphill as efficiently as possible.
When Running Downhill
Running downhill is a bit trickier, as you’ll have gravity pulling you forward. Leaning backward slightly is a natural choice. Still, to do that correctly, you’ll want to ensure that your center of gravity is behind your body.
That will ensure you don’t run downhill out of control and fall over while also giving you the ability to control your speed against the forces of gravity.

Trail Running (Flats, Uphill, Downhill)
Eyes
What you’ll want to do when you run through the trail is to look somewhere between 45 and 60-degrees from the ground up
Running Stance
You’re running stance on trails will change whether you like it or not. If you can continue to run as you run on the road you will end up hurting yourself. You’ll need to adjust your running stance to a much wider stance. You’re going to want to spread your arms out a bit by widening your elbows. This will help you balance more on the technical parts of the trail.
Running Stride
Also, your stride will change as well, you’ll find that you’ll be extending your stride more often than on the road so that you can maneuver more easily around obstacles. Don’t forget to pick up your feet when on the trails. When you run on the pavement, your feet stay much closer to the ground due to the even surface. When you’re on the trails running close to the ground is a sure way to trip yourself up and go yard sailing, instead of running, down the trail.
Running on a trail will train your versatility, as you’ll need to ‘switch modes’ whenever the terrain changes. On a trail, you’ll run on a combination of flats, uphill and downhill as well.
For more on trail running for beginners check out:
Trail Running For Beginners! 8 Things To Know Before You Go

Slippery Terrain (e.g. Snow, Ice, or Rain)
Running on slippery terrain can be tricky, regardless of if it’s on snow, ice, or after rain. Here, the most important thing to do is be mindful of how you land on your feet, as you’ll need to be incredibly specific about how you take each step.
How To Run In The Cold Without Turning Into A Popsicle
Here, you’ll want to land with your body weight perfectly aligned with the ball of your foot. Land too far ahead, to the side of the back, and you risk the possibility of your foot slipping.
You might also want to slip on some shoe grips that fit over your running shoes. Snow Grips help you run on the snow and ice by allowing the coils on the sole to dig in and gain traction into the snow and ice. These shoes operate a lot like snow chains (actually coils now) in the way that they look and function.

Yaktrax Run Traction Cleats for Running on Snow and Ice (Amazon Link)
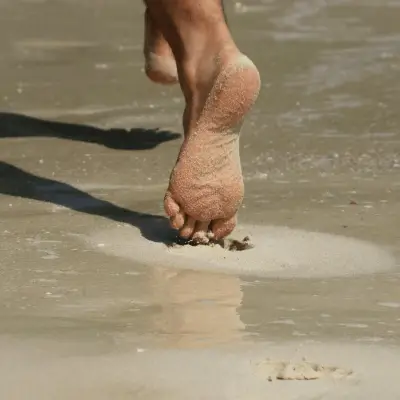
Barefoot Running On Sand
Running barefoot on sand isn’t as easy as running on flats, which is why it’s so popular. It’s a great way to burn more calories and challenge your body, especially all of the smaller muscles below your knee, like your ankles and the arches in your feet.
Still, because it’s so tough on those smaller muscles, keeping your runs short is the most important thing. No matter how conditioned you are as a runner, switching over to barefoot running on sand requires a longer adjustment period to avoid straining those smaller muscles.
Generally, running barefoot on sand requires a greater range of motion. So what you’ll be doing is sticking to the same running form as you would on flats but increasing the range of motion for each of those movements.
For a complete detailed post about how to start running barefoot check out:
How to remain injury-free while barefoot running
Sprinting On A Track
Last but not least, let’s talk about sprinting on a track. Sure, for the most part, the proper form here is the same as running on flats. But remember: you’re sprinting, which means a short burst of maximum energy to run as fast as you can.
Body Lean
For this, you’ll want to increase your body lean to about 10 degrees forward. Besides that, the most important thing is your arms, as they’ll help you drive more power and momentum forward. Swing your arms on the opposite side as your legs; right arm when the left leg touches the ground and left arm when the right leg is doing the same.
Arm Swing
When sprinting your arms will have a more range of motion because they help propel the body forward. On the backswing, the sprinter’s arm might be close to parallel with the ground behind the body. On the forward swing, the sprinter’s arms might be close to ninety degrees parallel to the ground in front of the body. While sprinting the arms should naturally swing in the sagittal plane (forwards and backward on either side) and not cross over the torso.
While running on flats at normal paces, the arms will naturally (gravity) swing across the abdomen because of the speed your running.
Avoid These Types of Posture Issues While Running
Erect Spine (no lean)
Don’t run with a perfectly straight up and down spine. You should always run with your spine slightly leaning at the hips 5 to 10 degrees (forward fold at hips). Running with a perfectly erect spine can cause an unneeded direct impact on your spine. Your knees, ankles, and feet should be absorbing most of the impact followed by your hamstrings, quads, and glutes.
Tucked chin into the chest
This reducing breathing efficiency, and places unneeded stress on your neck, head, and shoulders. This could happen when you get tired.
Arms / Elbows
shouldn’t cross the middle of your body (belly button) on the forward swing. When your arms start crossing the middle of your body, more than likely, your hips are twisting – which is a big NO.
Don’t hold your arms and hands up high near your shoulders. Your arms should be naturally swinging forward and backward.
Your elbows should be tucked into the side on the backswing. The only time you should run with your elbows outward is when running on trails (this helps to balance more on technical terrain).
Is your running getting harder instead of easier?
If you’ve suddenly felt your running mojo decrease and your running, simply put, is not getting any easier but harder instead. Check out: 13 reasons why your running is getting harder instead of easier.
References
| Help support me and subscribe to my YouTube channel. YouTube video - 30 ways to make your runs less painful! Coach Scott's Credentials:
|
To sign up for a FREE half marathon training schedule, log sheet, and pace predictor CLICK HERE.
Recommended gear for runners
Connect with me:
| facebook.com/BeginnerToFinisher/ |
14 thoughts on “Proper Running Form”